Amazon Web Services (AWS) recently launched the Elastic Kubernetes Services (EKS) in the GovCloud Region. The EKS service will now be presented to the FedRAMP JAB for accreditation such that government and defense organizations can start leveraging this service.
It goes without stating the Kubernetes is one of the hottest technologies in IT world- it truly has revolutionized application orchestration and management. However, as its adoption becomes more and more widespread, the importance to ensure it is configured properly according to different security benchmarks increases.
stackArmor has been at the forefront of leveraging security and compliance automation tools to help streamline the ability to secure and comply with critical FedRAMP, FISMA or CMMC requirements. This blog post helps describe our experiences with Kube-Bench to check security and compliance of an EKS configuration.
Kube-bench is an open source tool, that we were able to generate compliance reports for our Kubernetes clusters based on CIS benchmarks (Center for Internet Security), one of the more commonly adopted benchmarks. FedRAMP recommends using Center of Internet Security (CIS) benchmarks as a standard for securing cloud environments.
Benefits of kube-bench:
- Integrates easily in self-managed clusters or CSP-managed clustered such as GKE, AKS, or EKS.
- When using a CSP managed cluster – it will NOT scan your control plane.
- Generates an easy to read report with PASS and FAIL based on the check.
- Gives easy remediation steps for each of the fail steps.
- Can be run as a pod to easily scan all the nodes in your cluster.
Here is a brief guide on how to run in EKS
The example below is by using 100% Managed Worker nodes in AWS – with no SSH access.
- aws ecr create-repository – repository-name k8s/kube-bench – image-tag-mutability MUTABLE
- If you do not have one already, create a new ECR repository in same account as your EKS Cluster.
2. git clone https://github.com/aquasecurity/kube-bench.git
- Clone the kube-bench git repository.
3. cd kube-bench
4. aws ecr get-login-password --region <AWS_REGION> | docker login --username <AWS_USERNAME> --password-stdin <AWS_ACCT_NUMBER>.dkr.ecr.<AWS_REGION>.amazonaws.com
Log into your ecr repository using your aws credentials
5. docker build -t k8s/kube-bench .
- Build your docker image
6. docker tag k8s/kube-bench:latest <AWS_ACCT_NUMBER>.dkr.ecr.<AWS_REGION>.amazonaws.com/k8s/kube-bench:latest
- Tag the newly built image
7. docker push <AWS_ACCT_NUMBER>.dkr.ecr.<AWS_REGION>.amazonaws.com/k8s/kube-bench:latest
- push the image to ECR.
- Open job-eks.yaml in the clone repository and add the name of your image in the ECR repository.
- Kubectl apply -f job-eks.yaml
- Lauch kube-bench
- Kubectl get pods -n default
- Locate the kube-bench pod – it will have different string at the end of kube-bench
- Kubectl logs kube-bench-*string* > kubebenchreport.log
- Export the report to a file.
The contents should be something like this:
[INFO] 2 Worker Node Security Configuration
[INFO] 2.1 Kubelet
[FAIL] 2.1.1 Ensure that the – allow-privileged argument is set to false (Scored)
[PASS] 2.1.2 Ensure that the – anonymous-auth argument is set to false (Scored)
[PASS] 2.1.3 Ensure that the – authorization-mode argument is not set to AlwaysAllow (Scored)
[PASS] 2.1.4 Ensure that the – client-ca-file argument is set as appropriate (Scored)
[FAIL] 2.1.5 Ensure that the – read-only-port argument is set to 0 (Scored)
[PASS] 2.1.6 Ensure that the – streaming-connection-idle-timeout argument is not set to 0 (Scored)
[FAIL] 2.1.7 Ensure that the – protect-kernel-defaults argument is set to true (Scored)
[PASS] 2.1.8 Ensure that the – make-iptables-util-chains argument is set to true (Scored)
[PASS] 2.1.9 Ensure that the – hostname-override argument is not set (Scored)
[FAIL] 2.1.10 Ensure that the – event-qps argument is set to 0 (Scored)
[FAIL] 2.1.11 Ensure that the – tls-cert-file and – tls-private-key-file arguments are set as appropriate (Scored)
[PASS] 2.1.12 Ensure that the – cadvisor-port argument is set to 0 (Scored)
[PASS] 2.1.13 Ensure that the – rotate-certificates argument is not set to false (Scored)
[PASS] 2.1.14 Ensure that the RotateKubeletServerCertificate argument is set to true (Scored)
[WARN] 2.1.15 Ensure that the Kubelet only makes use of Strong Cryptographic Ciphers (Not Scored)
[INFO] 2.2 Configuration Files
[PASS] 2.2.1 Ensure that the kubelet.conf file permissions are set to 644 or more restrictive (Scored)
[PASS] 2.2.2 Ensure that the kubelet.conf file ownership is set to root:root (Scored)
[PASS] 2.2.3 Ensure that the kubelet service file permissions are set to 644 or more restrictive (Scored)
[PASS] 2.2.4 Ensure that the kubelet service file ownership is set to root:root (Scored)
[PASS] 2.2.5 Ensure that the proxy kubeconfig file permissions are set to 644 or more restrictive (Scored)
[PASS] 2.2.6 Ensure that the proxy kubeconfig file ownership is set to root:root (Scored)
[WARN] 2.2.7 Ensure that the certificate authorities file permissions are set to 644 or more restrictive (Scored)
[PASS] 2.2.8 Ensure that the client certificate authorities file ownership is set to root:root (Scored)
[PASS] 2.2.9 Ensure that the kubelet configuration file ownership is set to root:root (Scored)
[PASS] 2.2.10 Ensure that the kubelet configuration file has permissions set to 644 or more restrictive (Scored)
== Remediations ==
2.1.1 Edit the kubelet service file /etc/systemd/system/kubelet.service
on each worker node and set the below parameter in KUBELET_SYSTEM_PODS_ARGS variable.
-allow-privileged=false
Based on your system, restart the kubelet service. For example:
systemctl daemon-reload
systemctl restart kubelet.service
2.1.5 If using a Kubelet config file, edit the file to set readOnlyPort to 0 .
If using command line arguments, edit the kubelet service file
/etc/systemd/system/kubelet.service on each worker node and
set the below parameter in KUBELET_SYSTEM_PODS_ARGS variable.
-read-only-port=0
Based on your system, restart the kubelet service. For example:
systemctl daemon-reload
systemctl restart kubelet.service
2.1.7 If using a Kubelet config file, edit the file to set protectKernelDefaults: true .
If using command line arguments, edit the kubelet service file
/etc/systemd/system/kubelet.service on each worker node and
set the below parameter in KUBELET_SYSTEM_PODS_ARGS variable.
-protect-kernel-defaults=true
Based on your system, restart the kubelet service. For example:
systemctl daemon-reload
systemctl restart kubelet.service
2.1.10 If using a Kubelet config file, edit the file to set eventRecordQPS: 0 .
If using command line arguments, edit the kubelet service file
/etc/systemd/system/kubelet.service on each worker node and
set the below parameter in KUBELET_SYSTEM_PODS_ARGS variable.
-event-qps=0
Based on your system, restart the kubelet service. For example:
systemctl daemon-reload
systemctl restart kubelet.service
2.1.11 If using a Kubelet config file, edit the file to set tlsCertFile to the location of the certificate file to use to identify this Kubelet, and tlsPrivateKeyFile to the location of the corresponding private key file.
If using command line arguments, edit the kubelet service file /etc/systemd/system/kubelet.service on each worker node and set the below parameters in KUBELET_CERTIFICATE_ARGS variable.
-tls-cert-file=<path/to/tls-certificate-file>
file=<path/to/tls-key-file>
Based on your system, restart the kubelet service. For example:
systemctl daemon-reload
systemctl restart kubelet.service
2.1.15 If using a Kubelet config file, edit the file to set TLSCipherSuites: to TLS_ECDHE_ECDSA_WITH_AES_128_GCM_SHA256,TLS_ECDHE_RSA_WITH_AES_128_GCM_SHA256,TLS_ECDHE_ECDSA_WITH_CHACHA20_POLY1305,TLS_ECDHE_RSA_WITH_AES_256_GCM_SHA384,TLS_ECDHE_RSA_WITH_CHACHA20_POLY1305,TLS_ECDHE_ECDSA_WITH_AES_256_GCM_SHA384,TLS_RSA_WITH_AES_256_GCM_SHA384,TLS_RSA_WITH_AES_128_GCM_SHA256
If using executable arguments, edit the kubelet service file /etc/systemd/system/kubelet.service on each worker node and set the below parameter.
-tls-cipher-suites=TLS_ECDHE_ECDSA_WITH_AES_128_GCM_SHA256,TLS_ECDHE_RSA_WITH_AES_128_GCM_SHA256,TLS_ECDHE_ECDSA_WITH_CHACHA20_POLY1305,TLS_ECDHE_RSA_WITH_AES_256_GCM_SHA384,TLS_ECDHE_RSA_WITH_CHACHA20_POLY1305,TLS_ECDHE_ECDSA_WITH_AES_256_GCM_SHA384,TLS_RSA_WITH_AES_256_GCM_SHA384,TLS_RSA_WITH_AES_128_GCM_SHA256
2.2.7 Run the following command to modify the file permissions of the – client-ca-file
chmod 644 <filename>
== Summary ==
18 checks PASS
5 checks FAIL
2 checks WARN
0 checks INFO
If you notice, that there are certain items that return as WARN – these are not explicitly scored as their configuration may be implemented in multiple places. You can manually check the OS locations of your nodes to ensure the configuration is there. When using AWS EKS, there is an option to use AWS Managed Nodes with no OS access. If you opt for that option but would like to check the configuration you will need to launch a pod with volume mounted at root and exec into the pod to examine the host file system.
Create a yaml file with the following contents:
apiVersion: apps/v1
kind: DaemonSet
metadata:
name: node-debug
namespace: kube-system
labels:
k8s-app: node-debug
spec:
selector:
matchLabels:
name: node-debug
template:
metadata:
labels:
name: node-debug
spec:
containers:
– name: ubuntu
image: ubuntu
resources:
limits:
cpu: 100m
volumeMounts:
– name: hostpath
mountPath: /host
readOnly: false
stdin: true
command:
– “/bin/bash”
– “-c”
– “while true; do sleep 3000; done;”
securityContext:
privileged: true
volumes:
– name: hostpath
hostPath:
path: /
hostNetwork: true
hostPID: true
restartPolicy: Always
Run: kubectl apply -f <file.yaml>
Run: kubectl get pods -n kube-system and locate your newly launched pods

This creates a DaemonSet so a pod will be launched on each node in your cluster. You will need to perform the follow steps for each pod in the DaemonSet.
Run kubectl exec -it node-debug> -n kube-system – chroot /host
Make sure you put the name with the random string for node-debug>
This opens up a command line inside the container.

Let’s examine the TLS Cipher configuration for the kubelet service.
Open the file at /etc/systemd/system/kubelet.service in a text editor
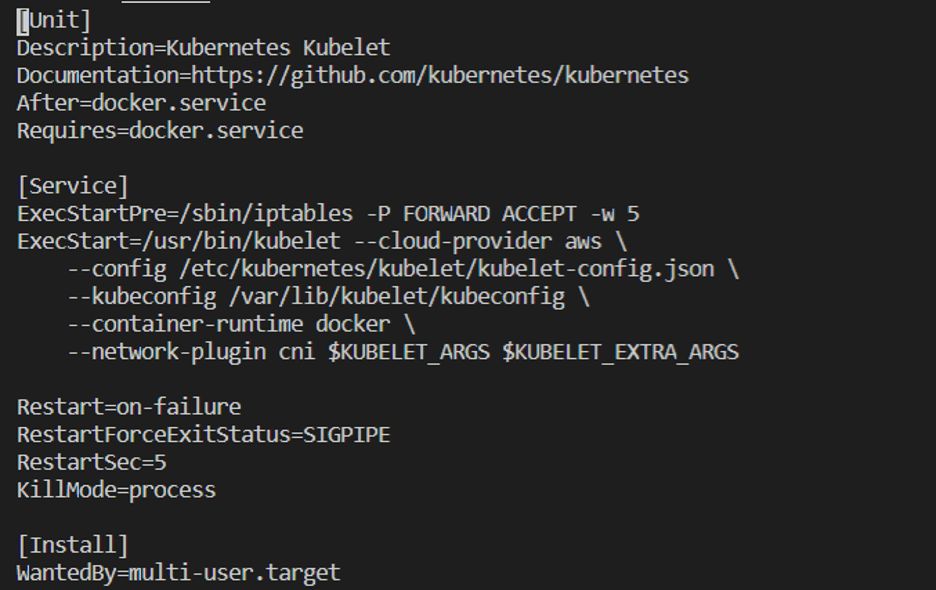
We see that the kubelet config is passed from a json file at different location. So let’s open that json file in a text editor. Scroll down to the tlsCipherSuites section:
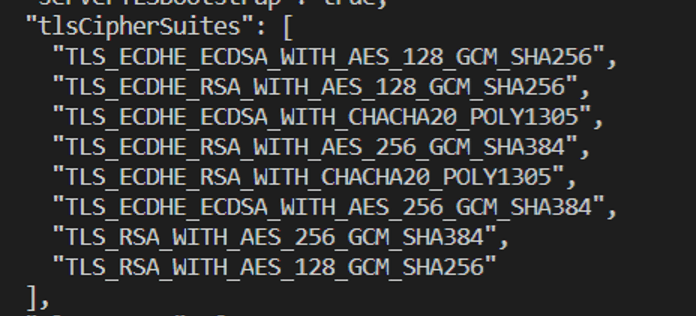
We see that this matches the same ciphers that kube-bench is looking for to mark the item as compliant!
Have questions about securing Kubernetes for compliance with FedRAMP, FISMA, or CMMC requirements? Contact us to learn more!